 Wiring & Taping Techniques
http://www.save-on-crafts.com/lenstemtec.html
Professional flower designers wire and tape stems for a good reason. Many flowers have heavy heads and need the extra support including roses. If you do not wire and tape them they will eventually start to droop.
You can extend the length of a flower easily, with wires and taping, so that it works in your arrangement.
Once cut flowers are wired you should tape them with florist tape to hold the moisture that is in the stem. And the tape conceals the wires.
Dried flowers and sometimes silks are covered with florist tape to ensure that the material does not slip out of a wired mount.
Lengthening a stem (Wiring Techniques)
Having the ability to lengthen a flower stem is a great advantage in flower arranging. Also, if the flower has two or more blossoms, you can cut off the blooms and give each flower a new stem. It is a money saver and provides other possibilities when arranging flowers. This technique can be used on fresh, silk or dried flowers.
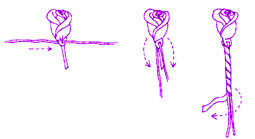
 Taping and Lengthening a stem
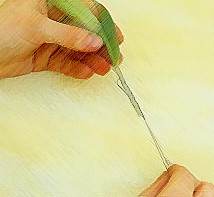
 1. Place a stem wire next to the flower stem. Hold the wire near its top. Wrap a piece of floral tape around the top of the wire and flower stem.
2. Twirl the stem while stretching and pulling the tape in a downward angle. The tape should be tightly wrapped around the wire and flower stem without buckles or gaps along the stem.
3. While taping the stem you may wish to add further stems setting the flower heads at different heights.
4. Fasten off just above the end of the wires by squeezing the tape against itself.
Making a Stay Wire
1. Group together four florist wires. Have each overlap the next by 1-1/4".
2. Start taping the wires together from the one end.
3. As the tape reaches the end of the first wire add another wire to the remaining three ends of wires and continue taping. And so on. Adding wires and taping four together until you achieve the required length.
 Pierce method
This wiring method is perfect for roses
To give support to a weak flower head with a thick calyx beneath the flower head, insert an 18-gauge stem wire.
1. Push one end of the wire horizontally through the calyx using half the length of the wire.
2. Bend both ends down parallel with the stem. Tape the wire starting just above the insertion.
Note: A second wire may be inserted through the flower so that the two wires are crisscrossed for heavier flower heads.
 Hook method
 This method works well if the flower head is firmly attached to the stem.
1. Cut the flower stem an inch from the bottom of the calyx. Insert the stem wire inside the center of the stem up into the flower head until it is secure.
2. Form a hook, and pull the wire back down through the flower.
3. Tape the stem and wire tightly.
 Single & Double Leg Mount
Single Leg Mount
This is for wiring flowers which have a strong stem or where a double weight of wire is not necessary.
1. Hold the flowers between your thumb and index finger letting the weight of the flower lay across the top of your hand. Position a wire behind the stem one third the way up.
2.Now bend the wire ends together -with one leg shorter than the other.
3. Holding the short wire leg parallel with the stem, wrap the long wire leg around both the stem and the other wire leg.
4. Straighten the long wire.
Double Leg Mount
Similar to the single leg mount but the double leg mount will lengthen the stem with two equal length floral wires.
1. Start by holding the flower between your thumb and index finger. Allow the weight of the flower to lay across the top of your hand.
2. Position a wire 1/3 the way up from the bottom of the stem. Note: 1/3 of the wire should be to one side of the stem.
3. Bend the wire parallel to the stem. One leg of the wire will be about twice as long as the other.
4. Hold the shorter leg against the stem and wrap the longer length of wire around both the stem and the other wire to secure.
5. Straighten both the wires legs which should now be equal length. See illustration above for finished look. Stem supports for heavy flower heads
A must for roses which have a woody stem that when bent will cause the flower to wilt. This will reinforce them and make them ready for arranging.
 Stem supports for heavy flower heads
A must for roses which have a woody stem that when bent will cause the flower to wilt. This will reinforce them and make them ready for arranging.
Flower supports add strength and flexibility to the stem allowing the flower to be gently bent.
1. Insert the end of a stem wire vertically into the base of the calyx.
2. Loosely wrap the wire around the full length of the stem in a spiral. Tape the stem to cover the wire.
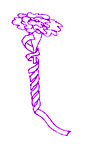
 Wiring a rose bud
Quite necessary if you are attempting more complex floral designs with roses. You will be replacing the rose stem with a wire so this arrangement would be perfect for drying.
Use this style of wiring for floral head pieces .
1. Cut the stem of the rose to 1-1/4" . Push one end of a floral wire through the seed-box (bottom of rose-thickest part) at the side. Holding the head of the rose in one hand wrap the wire firmly around and then down the stem.
2. Straighten the remaining wire to extend the the length of its natural stem. Cover the wire with florist tape.
 Wireless taping
Wireless Taping is a perfect technique for free flowing hairpieces or corsages.
1. Cut the stem to 1" long.
2. Wrap a piece of floral tape around the top of the stem and twirl the flower in one hand while twisting the tape lightly around itself until it is as long as you want it. If you need more support, tape it again.
No comments:
Post a Comment